In this blog post I’m going to show you how you can create an Azure Function that will interact with the Power BI REST API. I choose PowerShell as the programming language because in my opinion it was a bit easier to authenticate with the Power BI service. For the development environment, I’m using Visual Studio Code with the Azure Functions extension.
For an introduction on how to create an Azure Function project in VS Code and all the necessary prerequisites, check out the documentation: Quickstart: Create a PowerShell function in Azure using Visual Studio Code. Make sure you create an Azure Function with an HTTP trigger.
I also created a Function App in the Azure Portal. This will host your Azure Function once it is deployed to Azure. The most important settings are the runtime stack – PowerShell Core – and the plan type.

It’s also possible to create the Function App when you’re publishing your Azure Function from VS Code to your subscription. Before we start creating the Azure Function, we need to create a service principal (SP) as well. This SP will allow us to programmatically authenticate with the Power BI service, since we don’t want any interaction with the script.
In your Azure Active Directory, create a new app registration.

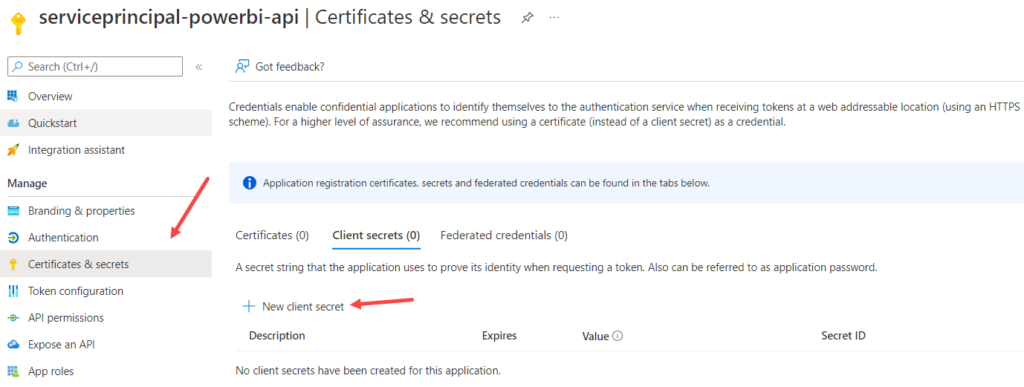
In the Certificates & secrets section, create a new client secret.

Choose an expiration date as far in the future as you can, which is apparently 2 years. There used to be a time when you could set this 100 years or so in the future, but it seems this has changed.

When the secret is created, immediately copy the value because this is the only time you’ll be able to do so.

Whatever you do, DO NOT ASSIGN API PERMISSIONS. If you do so, you will get an error (probably “Unauthorized”) if you try to use the Power BI REST API. You can authenticate, but you cannot do anything. I know, irony. The problem is described in this StackOverflow post: Power BI Rest API Requests Not Authorizing as expected. Here’s an example of a service principal that does have permissions assigned (again, do not do this). It’s a SP I used for a custom Logic App connector to the Power BI REST API (and there you do have to assign permissions. Confusing).

Aside from the secret, we also need the client ID and the tenant ID, which can both be found in the overview pane.

We can make these values available to our Azure Function in the Function App we created earlier. I chose to store the actual values in Azure Key Vault and create a reference to those secrets in the Function App. You can find more info in the documentation on how to do this: Use Key Vault references for App Service and Azure Functions. You can then add references in the application settings of your Function App.

Such a reference has the following structure:
@Microsoft.KeyVault(SecretUri=https://my-keyvault.vault.azure.net/secrets/mysecret/somecode)
You can retrieve the secreturi from the secret in your Key Vault. You can see if everything is configured correctly when the green check mark appears alongside “Key Vault Reference”. We still have a couple of configuration steps to do before we can start on the Azure Function. Create a security group in Azure AD and add the service principal to this group.

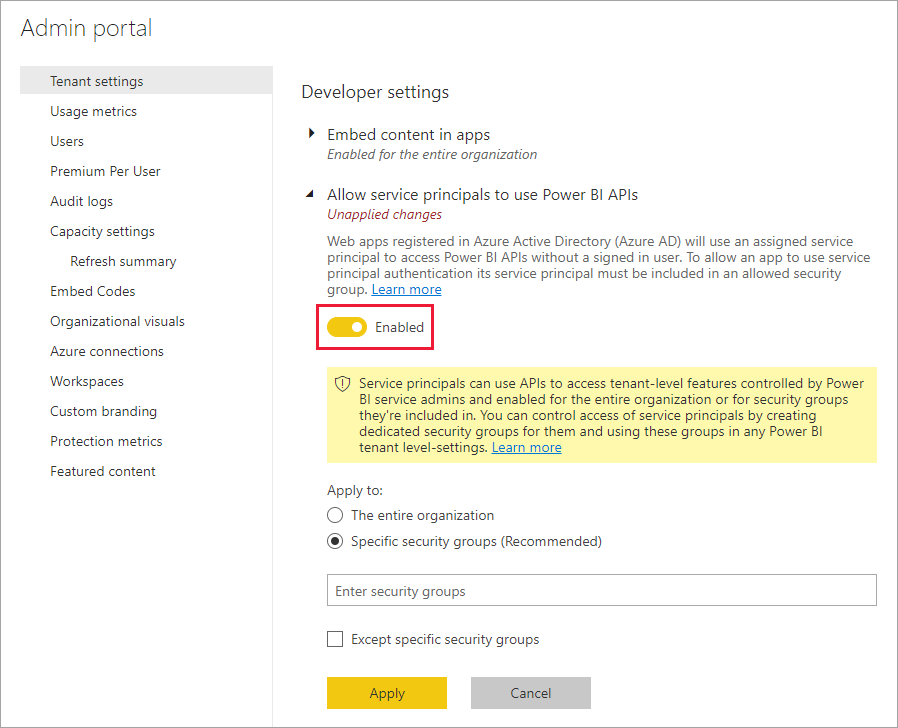
Now you need to head to the Power BI Admin portal and add the security group to the setting “Allow service principals to use Power BI APIs”:

This means the permissions for accessing the Power BI REST APIs are managed in Power BI, and not in Azure AD. That’s why it’s important not to add permissions in the app registration. After all this is done, we can finally start on the Azure Function.
This is the entire PowerShell script:
using namespace System.Net;

# Input bindings are passed in via param block.
param($Request, $TriggerMetadata)

# stop if an error occurs
$global:erroractionpreference = 1

# Write to the Azure Functions log stream.
Write-Host "PowerShell HTTP trigger function processed a request."

# Get secrets from local.settings.json (locally) or from app settings (Key Vault in Azure)
$username = $env:Secret_PowerBI_UserName
$password = ConvertTo-SecureString $env:Secret_PowerBI_Password -AsPlainText -Force
$tenantid = $env:Secret_TenantID

# Construct a credential
$psCred = New-Object System.Management.Automation.PSCredential -ArgumentList ($username, $password)

# Interact with query parameters or the body of the request.
$groupId = $Request.Body.workspace
$datasetId = $Request.Body.dataset

if($null -eq $groupId -or $null -eq $datasetId){
    #Write-Error -Message "Incorrect Request - Wrong input"
    $body = "Incorrect Request - Wrong input"
    $statuscode = [HttpStatusCode]::BadRequest
}
else{
    try{
        # Connect to the Power BI Service using the service principal
        # If an error occurs, the script jumps to the catch block and will set the status code to Internal Server Error.
        Connect-PowerBIServiceAccount -Tenant $tenantid -ServicePrincipal -Credential $psCred

        # this REST API call will retrieve the latest status of the dataset refresh
        $restURL = "groups/$groupId/datasets/$datasetId/refreshes?`$top=1"

        # execute the API call
        # If an error occurs, the script jumps to the catch block and will set the status code to Internal Server Error.
        $result = Invoke-PowerBIRestMethod -Url $restURL -Method Get

        # parse the JSON result set
        $myjson = ConvertFrom-Json $result
        $status = $myjson.value.Status

        $body = @{"LastStatus"=$status} | ConvertTo-Json -Compress

        $statuscode = [HttpStatusCode]::OK
    }
    catch{
        $body = $_.Exception.Message
        $statuscode = [HttpStatusCode]::InternalServerError
    }
}

# Associate values to output bindings by calling 'Push-OutputBinding'.
Push-OutputBinding -Name Response -Value ([HttpResponseContext]@{
    StatusCode = $statuscode
    Body = $body
})
Some lines of code are boilerplate code that’s generated for you when you create your Azure Function. The first 3 lines codes are an example of such code.

I added the line $global:erroractionpreference = 1. This tells PowerShell to quit processing once an error occurs. This settings kind of depends on how you want to handle your errors. If for example the authentication to Power BI fails, I don’t want the script to try to execute the REST API call in the next line, because that would be pointless.
In the next lines, we’re reading in some environment variables that contain the following values:
- the tenant ID (also known as the directory in Azure)
- the user ID of the service principal
- the password (or secret) of the service principal

Those environment variables will refer to the Azure Key Vault secrets when the Azure Function is running inside the Function App. However, if we want to debug our Function locally, we need to add the secrets to the local.settings.json file.

Like this:
{
  "IsEncrypted": false,
  "Values": {
    "AzureWebJobsStorage": "",
    "FUNCTIONS_WORKER_RUNTIME_VERSION": "~7",
    "FUNCTIONS_WORKER_RUNTIME": "powershell",
	"Secret_TenantID": "myTenantID",
	"Secret_PowerBI_UserName": "myUserName",
	"Secret_PowerBI_Password": "myPassword"
  }
}
Do not check this file into source control, because that would mean all your secrets are visible in plain text.
Using the username and password, a credential is constructed. In the next two lines, the workspace ID and the dataset ID are read from the HTTP request.

Then we’re checking if both values are found and are not NULL (in PowerShell, NULL should be on the left side of the expression):

If the validation fails, an error message is put in the body and the HTTP status code is set to Bad Request. If the validation succeeds, we’re trying to connect to the Power BI service using the tenant ID we retrieved and the credential we created. We’re using the Connect-PowerBIServiceAccount cmdlet.

Since this is an external module which is by default not present on a Function App (or on your local machine), we need to tell PowerShell to download it. We can do this by adding a reference to the requirements.psd1 file.

This is called a managed dependency. If you can successfully execute the cmdlet and you can authenticate with the Power BI service, you should see something like this in the output:

In the next lines, we’re calling the refreshes REST API endpoint. If you do a GET request, you get the refresh history, if you do a POST request you trigger a refresh. Since we’re only interested in the latest refresh, the parameter $top=1 is added to the URL. Don’t forget the backtick ` to escape the $.

If the API call was successful, we’re parsing the JSON result set and retrieving the value for the status. This value is then converted back to JSON and put in the body.

If everything went OK, we’re setting the HTTP status code to OK. If not, we’re catching the error in the catch block.

The exception message is stored in the body and the HTTP status code is set to Internal Server Error. Finally, the response is created by assigning the body and the HTTP status code to the output binding:

When you start debugging, you can execute the Azure Function locally by right-clicking it in the folder structure and choosing Execute Function Now…

At the top of the screen, a dialog box will appear where you can enter your HTTP Request:

Specify something like this:
{
	"workspace": "myworkspaceID",
	"dataset": "mydatasetID"
}
You can find the IDs when you go to the dataset in the Power BI service and you take a look at the URL. It should be something like this: https://app.powerbi.com/groups/mygroupID/datasets/mydatasetID/details.
If the Function succeeds, you will get a notification with the response:

You can now publish your Azure Function to the Function App and start using it! You can for example integrate it into Azure Data Factory or into a Logic App:

You can find an example on how to synchronously refresh a Power BI dataset in this article. In the article, I use a custom connector to the Power BI REST API, but you can replace this with the Azure Function (which is why I wrote the Function btw).
------------------------------------------------
Do you like this blog post? You can thank me by buying me a beer 🙂